Showing posts with label Tutorials. Show all posts

Saturday, February 14, 2015

Valentine's Day Sour Cream Cutout Cookies Personalized with White Chocolate Names


Happy Valentine's Day! 
Nothing says I love you more than a soft cutout sugar cookie with buttercream frosting and personalized with your name in chocolate

I made these for my daughter and her friends Valentine's Day. 
They will be celebrating one of the girls 16th birthday. 
The birthday girl is a huge fan of Harry Potter so I personalized 5 of the cookies with their names and then added a few Harry Potter decorations as well as a Sweet 16 decoration.

I decorated the cookies with buttercream frosting and then made their names and Harry Potter decorations with white chocolate candy coating. It's real simple, just print out the names and.or decorations and then trace ontop of wax paper. The peel off easily and then can be placed on top of a freshly frosted cookies.

Below are the recipes for the cookies and buttercream frosting and 
a tutorial for making chocolate names and designs.


Sour Cream Cutout Cookie Recipe:

Sour Cream Cutouts:

Ingredients:
2 cups sugar
1 cup sour cream
3 eggs
1/2 cup butter or margarine, softened
1/2 cup vegetable shortening
5 1/2 cups all-purpose flour
2 tsp. baking powder
2 tsp. baking soda
1 tsp. vanilla
1 tsp. almond extract
1/4 tsp. salt


Makes 10 dozen cookies

Directions:
In large mixing bowl, combine sugar, sour cream, eggs, butter and shortening. Beat at medium speed of electric mixer until light and fluffy. Add flour, baking powder, baking soda, vanilla, almond extract and salt. Beat at low speed until soft dough forms. Cover with plastic wrap. Chill 1 to 2 hours, or until firm. Note: this dough is very soft, don't worry. Let it chill for a few hours and it will be perfect to roll out and cut. 


Heat oven to 350 degrees. On well-floured surface, roll dough to 1/4 inch thickness (don't cut any thinner). Using 3 inch cookie cutters, cut desired shapes into dough. Place shapes 2 inches apart on ungreased cookie sheets. Bake for 6 to 8 minutes, or until edges are light golden brown. Prepare frosting as directed. Decorate cookies as desired. Let dry completely before storing. Freeze well unfrosted.


Buttercream Frosting:

Ingredients:
1/2 cup unsalted butter, softened
1/4 cup shortening
5 cups powdered sugar
2 teaspoon vanilla extract
1/4 cup milk
pink food coloring


Directions:

Mix softened butter on medium speed with an electric or stand mixer. Beat for 30 seconds until smooth and creamy.

Add powdered sugar, and vanilla extract until crumbly. Gradually add milk until frosting reaches desired consistency. Add a couple drops of pink food coloring.

Frost each sugar cookie using a knife and sprinkle with pink sprinkles.


Chocolate Names & Designs Tutorial

 Type your names using MS Word or your favorite word processor and print on white paper

 Place a sheet of waxed paper on top of the printed page

Melt the candy coating, such Make 'N Mold chocolate 
and place in a squirt bottle or decorating bag
 

Trace the name with the melted candy coating / chocolate
 

Let the candy coating / chocolate harden (it just takes a few minutes)
 
 Peel chocolate name from the wax paper and place on freshly frosted cookies


~Happy Valentine's Day~


Tuesday, November 15, 2011

Turkey Cupcakes {Tutorial}

It's that time of year again .. gobble gobble 'til you wobble!!

Here is a quick and fun way to decorate your cupcakes for your Thanksgiving dessert table or to bring to your child's school party (Oh, I miss those parties, my kids are now 12 and 14 so no more school parties, but they still love special treats at home).

About two weeks ago I taught a cupcake decorating class and as part of the I wanted to demonstrate how to use other foods, candies, etc. to assist in your cupcake decorating. I adapted these Turkey Cupcakes from Betty Crocker.

The cupcakes were made with boxed yellow cake, Betty Crocker Rich & Creamy Chocolate Frosting, Hershey Kisses Candy, and the turkey feathers were made from Hershey's Milk Chocolate Chips, Reese's Peanut Butter Chips and Wilton Candy Melts. See below how to make the turkey feathers and how to assemble the turkey cupcakes.

For the Cupcakes, you will need:
Ingredients:
  • 1 box of Yellow Cake Mix
  • 1 can of Chocolate Frosting
  • Hershey Kisses
  • Chocolate Candy Turkey Feathers (see how to below)
Directions:
Bake cupcakes according to the package directions. For tasty cupcakes, don't over bake! Follow the directions below on to assemble the Turkey Cupcakes.

For the Chocolate Candy Turkey Feathers, you will need:
Ingredients:
  • Wax paper
  • Ziploc sandwich bag (or pastry bag)
  • Hershey's Milk Chocolate Chips
  • Reese's Peanut Butter Chips
  • White paper (such as printer paper)
  • Wilton White Chocolate Melts*
  • Orange food coloring*
Note: You may use Orange colored White Chocolate Melts but I was looking for a lighter orange color so I used food coloring to make them orange color I preferred. (add food coloring to the white chocolate melts immediately after melting, stir until color is incorporated).

Hand draw a feather template where the feather is 3 inches high by 2.5 wide. Next, hand draw a small feather template that is 2.5inches high by 2 inches wide. Here's a sample (where I have the large and small feathers drawn near each other)


Place approximately 1/2 cup of peanut butter chips in a microwave safe bowl. Micorwave until just melted (30-40 seconds. time will vary depending on your microwave.)

Spoon the melted peanut butter chips into a Ziploc sandwich size bag. Close the bag (remove as much air as you can before closing).
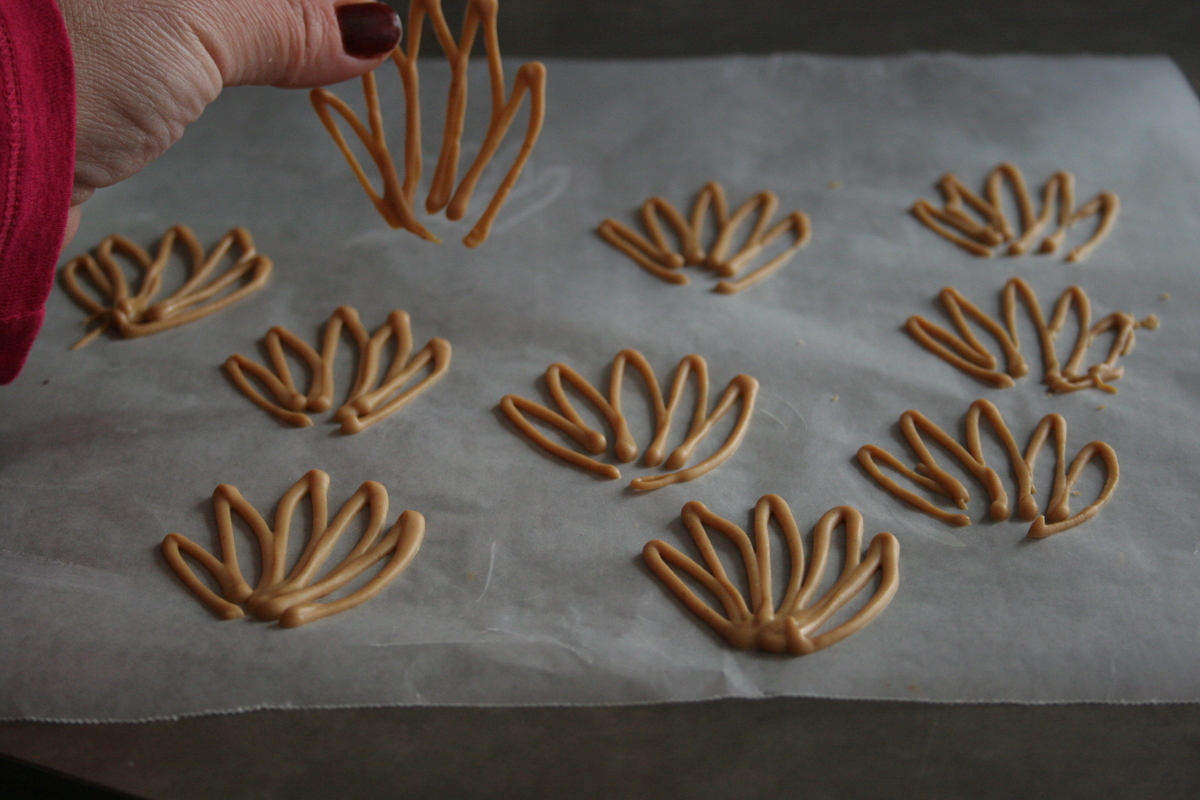
Cut a very small opening at the tip of the bag ...Place a sheet of wax paper over your feather template. And now begin to pipe the feathers following your template (use the SMALLER template for the PB feathers). After you've completed the first feather, slide your wax paper over template just enough so that you can pipe another feather. Continue to make 24 feathers (for 24 cupcakes). You will do the same for the Orange White Chocolate Feathers by piping over the smaller feather template. And the repeat the steps for the Milk Chocolate Feathers by using the LARGER feather template.

The photos below show you how to pipe using the smaller feather template:


Leave feathers on wax paper to harden (maybe 30 minutes). You can carefully place them in the fridge if you want them to harden faster. Once they have hardened, carefully remove them from the wax paper.Repeat the above for the Orange White Chocolate Feathers and for the Milk Chocolate Feathers (Use the LARGER template for the Milk Chocolate Feathers).
Note: We loved just eating the PB feathers so you may want to make a few extras for munching.
And Just for fun my daughter made a little chocolate turkey :)

To assemble Turkey Cupcakes:

Frost the cupcake with a generous amount of chocolate frosting:
Insert Milk Chocolate Feather into the frosted cupcake as such:
Insert Orange White Chocolate Feather:
(Do the same for the Peanut Butter Feather - Sorry I don't have a photo for that )

Place Hershey Kiss in front of the feathers:

Ta, Da!! ... Turkey Cupcakes!!
Gobble, Gobble and Happy Thanksgiving!

Sunday, October 23, 2011

Candy Corn Goodie Bags {How To}


Surprise Ending


Memorable as Pink-O-Ween is, the evidence will be long gone in your guests' bellies by night's end. Create take-home goodie bags so the dream never dies.


Candy Corn Goodie Bags


Pick colors that match your theme; Debbie used white, pink and black velvet. I adapted a Candy Corn Felt Sachets tutorial to my liking by making the bags larger and sewing the strips of fabric so that the seams were hidden.


Fill the bags with take-home treats your guests can enjoy later. I went with festive pink nail polish, pink candy and Play-Doh for the kids to enjoy at the party, or at home.

Friday, October 14, 2011

Acorn Candy Cookie Toppers {Tutorial}


I've been doing some fall cupcake baking week and trying out different cupcake toppers that would be good for fall. I found several ways to make acorn toppers using Mini Nilla Wafers and Hershey Kisses. Here is a quick tutorial on how to make some for yourself. These are easy to make (easy enough for kids to make too) and they taste good.


Nilla Wafer Acorns - Tutorial

You will need: Mini Nilla Wafers, Hershey Kisses and Chocolate Frosting:


Steps:
1. Put a small amount of frosting on the bottom of the Mini Nilla Wafer


2. Place the bottom of the Hershey kiss onto the frosted cookie


3. Add a dab of frosting to the top of the Mini Nilla wafer cookie (for the stem)


All done, here's your Acorn Cookie Candy topper:


The Acorn Candy Cookies make great cupcake toppers or just eat them up!


~Enjoy