Thursday, February 11, 2010

Happy Valentine's Day

I love Valentine's Day. I think it's the all the pink and red and the romantic decorations are what draw me in to it. Like these cupcakes that my hubby made for our daughter's Valentine's Day school party today. How sweet was that? Daddy making the cupcakes?!?? I get to take the credit later today. After all, I did put the heart shaped toothpicks into the cupcakes :)

Now while he was busy making cupcakes I've been busy making romantic decorations. I found this Ruffly Felt Rosette Wreath tutorial on Domestifluff and fell totally in love with it! I thought, hey, this would make a great heart shaped Valentine's Day wreath. The tutorial uses a styrofoam circle but I could not find a heart-shaped one so I purchased a 12" straw heart-shaped wreath... have you ever try to make something with a straw wreath?? .. ugh.. I had a mess everywhere. So luckily I bought two and I tried a second time using my 10 yr old's suggestion to leave the plastic wrap on the wreath .. it worked!


It is some what time consuming making all of the 3" felt circles (289 to be exact). I used my OLFA Circle Cutter (which by the way is the neatest little tool) to cut my felt circles.


Here is a demo video on how to operate the OLFA Circle Cutter ...


Happy Valentine's Day!

Monday, February 1, 2010

Projects

Wow! Has it really been this many weeks since I've blogged?!? Life has just been too busy. I've been working on several projects with my new serger as well as with my regular sewing machine but I haven't had to chance to share here on my blog. I will start out with my most recent handmade goodies and will work backwards to share what what I have been doing.

This week I made some aprons that would be really cute for Valentine's Day or any time of year. I branched out and made a few vintage-inspired aprons as well some sassy aprons with pleated bottoms (which I have to say I really think came out nice). These Sassy Pleated Aprons are my own pattern.

It has been incredibly cold and snowy here so I've been keeping myself busy doing some crafty type things with fabric. I've been trying out a few tutorials that I have found online and would like to share them with you as work on them. In January it was my mom's 70th birthday so I made these adorable no-sew fabric baskets for favors using this tutorial at CraftStylish. They were a bit messy but I had a great time making them and think they came out great:

This tutorial is so versatile. The little favor baskets can be re-used for holding things such as paper clips, bobby pins, sewing pins, loose change, etc. How about making them with kid friendly fabric and then they can be used to hold tiny little toys (like polly pockets - anyone with a little girl must have polly pocket pieces that need a place).

I'll be back (soon I promise with more).

Tuesday, December 15, 2009

Come on in ....

Merry Christmas & Happy Holidays! My husband, kids and I have been getting ready for the big day! We got our house decorated and tree up last week. And we even had enough snow to have a day off from school last week so we got a start on the holiday baking a little early (early for us anyway).

Come on in to our home and take a look at how we celebrate the Holiday season .... I will show your our home and share some of our favorite recipes ...

Oh Christmas Tree ...

Here is our Christmas tree ... my kid's most favorite part of Christmas (except for the presents of course)

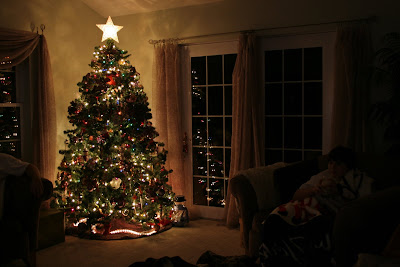
We have so many ornaments it's crazy! Here are a few our favorites ....


Some how over the years we started a tradition where the kids have there own 'side' of the tree. This is where they put their ornaments and this is the side of the tree where Santa delivers his presents. A few years ago we had these wire names made for our tree that way there is no confusion on which side is who's :). These are my favorite Christmas tree decorations ...


The right side 'belongs' to Matt...

The left side 'belongs' to Sarah ...

Let it Snow, Let it Snow ....


Have you ever seen a snowman kit ... All you need is snow ....


Cookie Time ...

Peanut Butter Balls:

Ingredients:
2 cups creamy peanut butter
1/2 cup butter
1 tsp vanilla
3 cups confectioner's sugar
3 cups crisp rice cereal
2 cups milke chocolate chips
2 tbsp shortening

Directions:
1. Melt peanut butter and butter in a large pot, over low heat. Add vanilla and mix. Add confectioner's sugar and mix until well combined. Remove from heat and add crispy rice cereal and mix together thoroughly.
2. Form 1 inch balls, spread on wax paper/parchment lined cookie sheets, chill until firm in the refrigerator.
3. Melt chocolate and shortening in a double boiler and keep melted while working with balls. Dip each peanut butter ball (I do one at a time) and then place on wax paper/parchment. A teaspoon to dip the balls works well (gently place the ball in the peanut butter and move the ball around with a teaspoon in the melted chocolate until covered well. Then remove the ball with the spoon).
4. Keep the peanut butter balls chilled until serving. Or you may freeze them and then thaw when ready to serve.


Hershey Kiss Blossom Cookies:


Ingredients:
3/4 cup peanut butter
1/2 cup shortening
1/3 cup granulated sugar
1/3 cup packed light brown sugar
1 egg
2 tablespoons milk (whole or 2%)
1 1/2 cups all-purpose flour
1 tsp baking soda
1/2 tsp salt
48 Hershey Kisses, unwrapped
Granulated sugar

Directions:

1. In a bowl cream the butter. Add the peanut butter and sugars and beat until light and fluffy (about 2-3 minutes). Add the egg and vanilla extract and beat to combine. Beat in the milk. In a separate bowl whisk together the flour, baking soda, and salt. Add to the peanut butter mixture and beat until incorporated. Cover and chill the batter for about an hour, or until firm enough to roll into balls.

2. Preheat oven to 375 degrees and place rack in the center of the oven.

3. Place the granulated sugar in a shallow bowl. Roll the batter into 1 inch balls and roll each ball in the sugar. Place on a prepared baking sheet.

4. Bake the cookies for about 8-10 minutes, or until the cookies or lightly brown. Immediately upon removing the cookies from the cookie sheet, place chocolate Kiss in the center of each cookie, pressing down until the cookie just starts to crack. Cool completely.


Happy Holidays from Us!


Monday, November 30, 2009

Apron Giveaway

The Fabric Shopper & I are offering my first Apron Giveaway!! I will be giving away one of my Utility Vendor Craft Aprons. This apron is great for those of you that are vendors at craft fairs or farmer's markets, as well as for those that like to craft, sew, scrapbook, stamp, etc. The apron has a total of 8 pockets. The front layer of pockets has 4 angled pockets and 1 small straight pocket. The angled pockets are great for items such as pens, pencils and scissors, and rotary cutters. The angled pockets are designed so that these items will not poke you while you are working, sitting or bending. The apron has a second (or back) layer of pockets which has 1 straight large pocket and 2 straight medium pockets. These pockets are great for carrying such things as money, receipts, and business cards.

Head over The Fabric Shopper and see how you can win this apron. Be sure to read through her blog and bookmark it. She has wonderful information about fabric, fabric sales & discounts, patterns, and more.


Good Luck!!

Sunday, November 15, 2009

Where Women Create

Over the past year I've met and read about so many talented women that create handmade goods either for themselves, friends, family or sell their handmade creations. It's just amazing what talent is out there. And the internet has been a great avenue for all of these women to 'meet' one another and learn from one another. My inspirations mainly come from seeing what these women are capable of the creating. So I've become a total internet junkie.. reading blogs, tweeting, facebooking, etc. But now and again I really like to sit down and hold a magazine in my hands and read articles and gaze at pictures and flip pages back and forth and not have to worry about bookmarking a link on my computer so I can find my way back. There's something to be said about holding a magazine or book in your hands. It really is satisfying. Last year a creative friend of mine introduced me this wonderful magazine called Where Women Create... wow !! ... I look forward to each and every issue. Each issue is filled with total inspiration . The magazine will introduce to you so many talented women and what they create, what inspires them, tips and tricks and best of all you get take a look inside their amazing studios. You really need to buy this magazine!!

You can find Where Women Create on twitter, facebook, and their blog. They are very active on the internet so there's always something to read that will inspire you!

Tuesday, November 10, 2009

Halloween Night

I'm not sure exactly why, but we all love Halloween in our family. The decorating, the food preparation, the costume ideas & creations ... it's all fun!

My daughter is still at the age where she loves to trick-or-treat. My son wasn't so sure if he was too old/too cool to trick-or-treat so he decided to have a party at our house and the boys could all decide if they wanted to trick-or-treat or not... of course... why wouldn't they wont to go door to door to fill up their enormous bags with candy!?! At one point during the night we had 25 kids gathered in our house. It really was a fun night for everyone!

As I said before I love to decorate for Halloween and make spooky foods. Here are some photos and recipes from our Halloween Night...

Our Haunted House...


Spooky Party Foods...

Swamp Punch:
Ingredients:

* 2 quarts lime sherbet
* 1 (12 ounce) can frozen limeade concentrate, thawed
* 2 liters carbonated lemon-lime beverage, chilled
* 1 1/4 cups cold water

Directions:

1. Spoon sherbet by tablespoonfuls into a punch bowl.
2. Mix 1.25 cups cold water with the lemonade concentrate; add to sherbet.
3. Slowly pour soda down side of the bowl; stir gently to mix.

Watermelon Brain:

Ingredients:

1 Watermelon cut in half lengthwise or purchase 1/2 watermelon

Directions:
  1. Slice off bottom of watermelon so it won't roll around.
  2. Peel green skin off of the watermelon.
  3. Score brainy folds in white flesh.
  4. With a sharp paring knife, carve channels out of melon to resemble cortical folds.
Finger Foods:
Ingredients:

* 1 can refrigerated breadstick dough
* 1 package sliced pepperoni

Directions:

1. Separate breadsticks and place on greased cookie sheet.
2. Cut pepperoni into fingernail shapes and press into dough.
3. Cut knuckle marks into "fingers" and sprinkle with rosemary to create a hairy-knuckle look. (I ran out of time to do this part)
4. Bake according to package directions.

Treats for my daughters class at school:

I made these treat bags from orange fabric and green polka ribbons. Real easy to make and the kids really enjoyed them (at least they acted like they did). Since the kids get so much candy at Halloween, I decided to fill the treat bags with somewhat healthy snacks, such as, gold fish, fruit roll ups, etc.


Here are the bags before I filled them...
Jack-O-Lantern Rice Krispy Treats...

Pumpkin Carving...

* *Happy Halloween!*