Sunday, September 23, 2012

Fall is Here & Acorn Squash


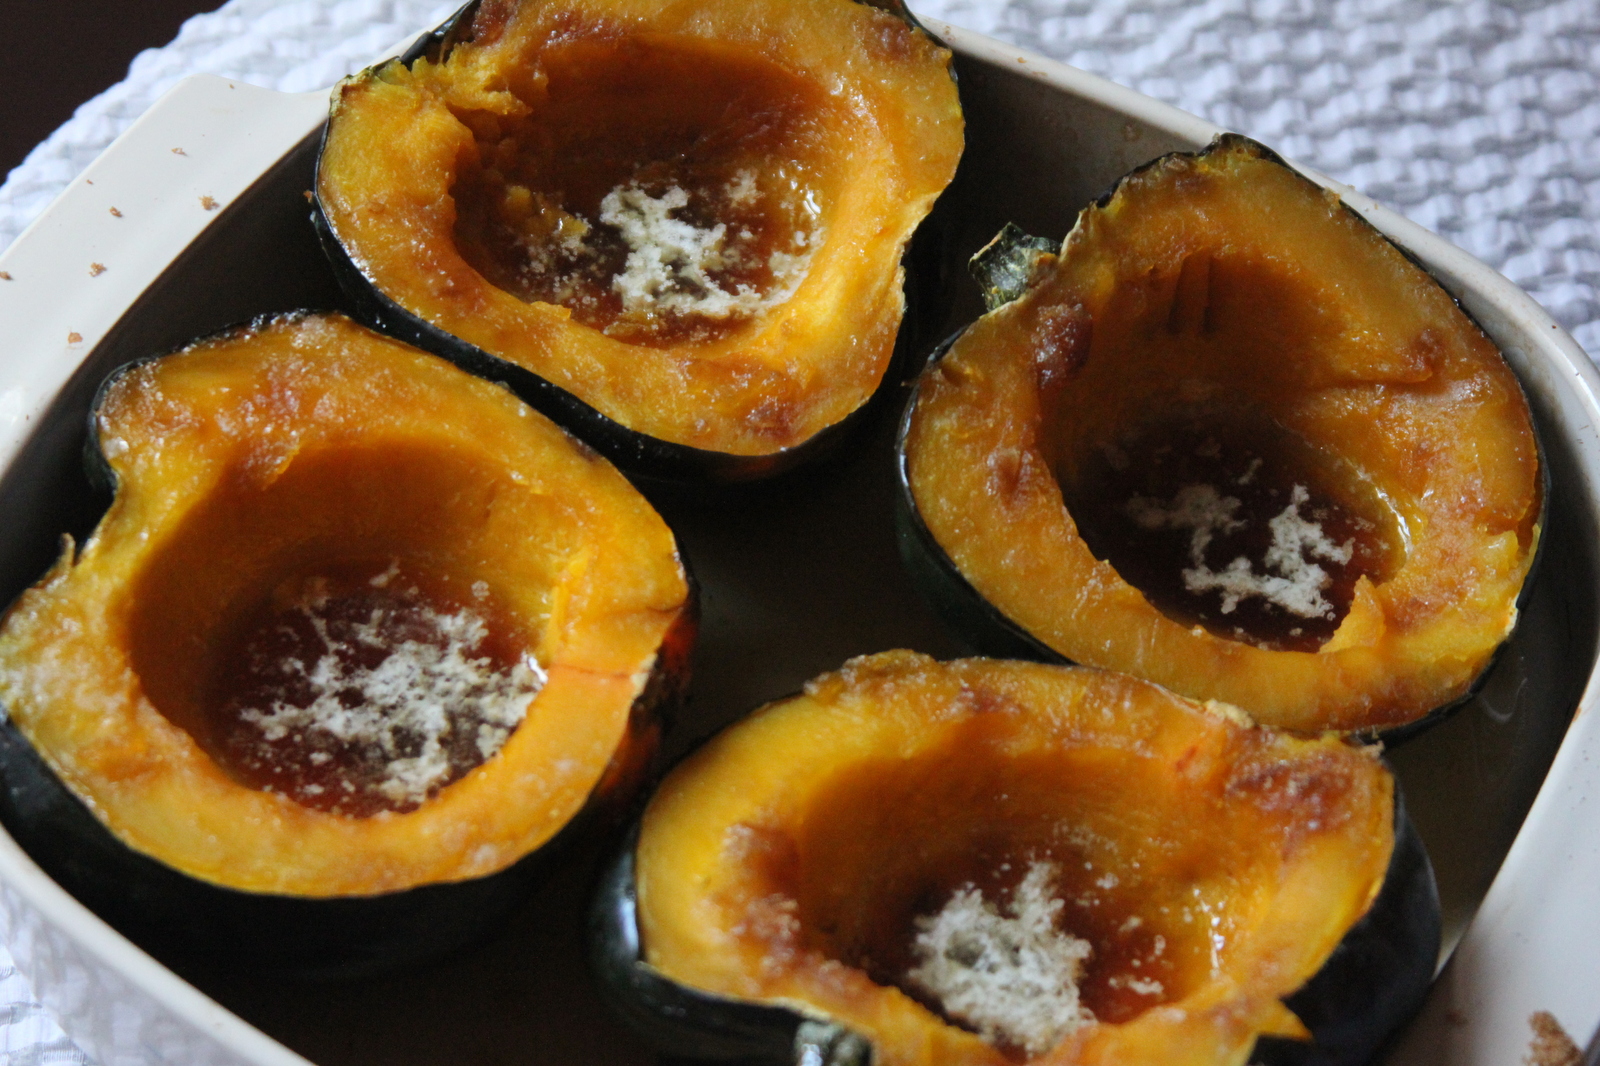
The weather has quickly cooled down around here. It was a brisk 40 degrees this morning when we woke up this morning. I stopped by a small local grocery store today and they were just brinigng in some Acorn squash. Just a perfect idea for a side dish to go with our chicken dinner tonight. Acorn squash are easy to prepare - just cut them in half, scoop out the seeds, add some yummy toppings like a little brown sugar, maple syrup, butter and bake for a little over an hour. 

 Ingredients:
  • 1 Acorn squash
  • 1 Tbsp Butter
  • 2 Tbsp Brown Sugar
  • 2 teaspoons Maple Syrup
  • Dash of Salt
Directions:
  1. Preheat oven to 350 degrees F..
  2. In a large casserole or baking dish, turn acor
  3. Turn squash upside down so that the flesh faces down. Fill with the baking dish with approximately 1 inch of water (to keep the squash from burning). Bake in a 350 degrees oven until it begins to soften, approximately 30 to 45  minutes.Do not under cook.
  4. Remove squash from the oven and turn right side up so that the flesh is facing upwards. (Keep the squashin the baking dish). Place butter, maple syrup, and brown sugar into each squash.
  5. Place squash in the 350 degrees F (175 degrees C) oven and bake another 20-30 minutes. 
Note: I made 2 acorn squash (4 halves). So I doubled the recipe. You can add more brown sugar and/or maple syrup to your liking. I went for a little extra maple syrup tonight.  (The white you see in the photo is the butter, it foamed up a little bit while baking - nothing wrong with that, it still tastes great).


I Love Fall!!

Wednesday, September 12, 2012

Warm Butter Buns


My all time favorite thing to cook is any kind of bread, roll or bun. I've been collecting pins over on Pinterest of all the breads that I would love to try. Of course it would take some time to make each recipe but I'll give it whirl and see how many I can make during the fall and winter months ahead. 

This a Butter Bun recipe that I found from Roxana's Home Baking. It's really easy and tastes great (especially right out of the oven).

The Butter Buns look a bit different that what hers do I. I think it has something to do with how I added the yeast (I made a bit of mistake while making them-I didn't let the yeast dissolve very well in the first step) but they still tasted great with our Roast Beef and Mashed Potatoes dinner.

Here is the recipe that I got from her blog. Be sure to check out her blog and her recipes. She has some real good ones that are worthy to try.

Roxana has a great tutorial for you follow while making these.

Ingredients:
  • 1/4cup water or milk
  • 1 pkg Rapid Rise Yeast
  • 4 cups all-purpose flour 
  • 1 egg or 2 egg yolks
  • 4 Tbsp melted butter
  • 1 cup luke warm milk
  • 1 to 2 tsp salt (I used 1 tsp salt since I used salted butter)
 Directions:
  1. In a bowl mix 1/4 cup water or milk with 1 package rapid rise yeast.
  2. Stir and let the yeast dissolve. It’s going to slightly foam.
  3. In your mixer bowl add 4 cups all purpose flour
  4. Pour the yeast mixture over the flour
  5. Add 1 egg or 2 egg yolks
  6. And 4 tbsp melted butter
  7. In a measuring cup mix 1 cup of lukewarm milk or water with 1-2 tsp salt. If you used salted butter I you may not want to use more than 1 tsp of salt.
  8. Start mixing slowly adding the milk (or water)
  9. The dough might need a little bit more milk. Slowly add 1 tbsp at a time until the dough is soft and cleans itself from the sides of the bowl.
  10. Put the dough into a greased bowl, cover with plastic foil and leave at room temperature until it doubles in volume. (should take about 30-40 minutes)
  11. Grease a 11×7 deep dish and put aside. Divide the dough into 16 almost equal balls. Shape them into small baguettes and place them into the baking dish. Cover again with plastic foil and leave at room temperature.
  12. Turn the oven on and let it reach 375F. The oven should be on for about 10 minutes (plus other 5 minutes until it reaches the desired temperature) before you place the buns in.
  13. When your oven is nice and hot and your buns are almost doubled in size brush them with some more melted butter and place them into the oven
  14. Bake for 23-25 minutes until golden. Brush with some more butter as soon as you take them out of the oven. (I eliminated the extra butter here .. however I served these warm with extra butter for those that wanted it),
Enjoy warm from the oven with some butter! yum!


Friday, September 7, 2012

Birthday Dirt Cake


It's hard to believe my baby girl will be turning 13 on Monday. I know we all say the time goes really fast while our children are growing up..but holy cow..it is way too fast!! She is waiting to celebrate her special day on the 10th but not all of our family can't get together on Monday so tonight we will be having a small pre-birthday celebration. I told her to pick whatever dessert she wanted and Dirt Cake was the choose. And she reminded me to not forget the gummy worms!

This is the recipe I use for Dirt Cake. It's always a winner with the kids as well as with the grownups. What's not to like, chocolate pudding, cream cheese, Cool Whip, Oreos and gummy worms.


Ingredients:

  • 1/2 cup butter, softened
  • 1 (8 ounce) package cream cheese, softened
  • 1/2 cup confectioners' sugar
  • 2 (3.5 ounce) packages instant vanilla pudding mix
  • 3 1/2 cups milk
  • 1 (12 ounce) container frozen whipped topping, thawed
  • 32 ounces chocolate sandwich cookies with creme filling

Directions:

  1. Chop cookies very fine in food processor. The white cream will disappear.
  2. Mix butter, cream cheese, and sugar in bowl.
  3. In a large bowl mix milk, pudding and whipped topping together.
  4. Combine pudding mixture and cream mixture together.
  5. Layer in a 13x9 dish, starting with cookies then cream mixture. Repeat layers.
  6. Chill until ready to serve.

Happy Early 13th Birthday my dear Sarah!

Sunday, September 2, 2012

Chocolate Peanut Butter Fudge Cake


All I can say about this Chocolate Peanut Fudge Cake is Yum, Sinful, Delicious, Fudgie, and Delightful !  Gourmet Mom has most definitely perfected this cake. To me, it tastes like an inside out Chocolate Peanut Butter Buckeye (you know, those delightful peanut butter balls dipped in chocolate that you see around during the holidays.)

This was a must try recipe for last week's campfire gathering with my friends.

If you like Peanut Butter and Chocolate you have to try Gourmet Mom's recipe (it IS perfect). And be sure to stop by and tell her Thank you!


 Cake for two :) :)

Peanut Butter Chocolate Fudge Cake
Cake:
  • 1 box Chocolate Fudge cake mix (or any chocolate cake mix)
  • 1 (3 oz.) box instant chocolate pudding
  • 2 C. sour cream
  • 5 eggs
  • 1 C. melted butter
  • 1 tsp. vanilla extract
  • 1 C. chocolate chips (I recommend ghirardelli)
Directions:
In a large bowl, beat first 6 ingredients until well blended. Mixture will be thick. Stir in chocolate chips. Pour into three greased 9” pans. Bake at 350 degrees for 25-40 minutes. (Keep an eye on them so they don’t overbake). Cool completely. I actually like to pop them in the freezer for easy assembling.


Peanut Butter Buttercream Icing
 
Ingredients:
  • 2/3 cup solid vegetable shortening
  • 2/3 cup butter
  • 1 3/4 cup peanut butter
  • 1 cup milk
  • 2 teaspoons Vanilla Extract
  • 6-8 cups sifted confectioners' sugar (approx. 2 lb.)
Directions:
Cream shortening and butter with electric mixer.
Add peanut butter, milk and vanilla.
Gradually add 6 c. sugar, one cup at a time, beating well on medium speed. Scrape sides and bottom of bowl often. When all sugar has been mixed in, icing will appear dry.
Add milk and beat at medium speed until light and fluffy. Add more sugar (or milk) as needed until icing is desired consistency (should be firm enough to hold a shape but still smooth)
Keep icing covered with a damp cloth until ready to use. For best results, keep icing bowl in refrigerator when not in use. Refrigerated in an airtight container, this icing can be stored 2 weeks. Re-whip before using.

Enjoy!

Friday, August 31, 2012

Watermelon Rice Krispie Treats

I found this fabulous idea floating around on Pinterest. These watermelon Rice Krispie Treats are great idea for summer time picnics, Labor Day, Memorial Day, July 4th ... or any time you need a cute Krispie treat.


There are many recipes and instructions on the internet to show how to make these. I'm positively sure they are all tasty and they all come out looking so cute! This is my version on how to make them. I made 4 batches for a July 4th picnic and had good results.

INGREDIENTS
  • 2 (10 oz) bag marshmallows
  • ½ cup butter, plus extra for greasing
  • 8 cups of Kellogg’s Rice Krispies
  • Red or Rose Food Coloring
  • Green Food Coloring
  • Raisins or chocolate chips for garnish
For the Green Layer:
  1. Grease one 9” round cake pan and set aside.
  2. Place four cups of Kellogg’s Rice Krispies in a large bowl.
  3. Melt ¼ cup of butter in a large sauce pan over low heat. Add green food coloring (a few drops at a time until desired color). Add regular marshmallows and stir till melted and well blended. Cook two minutes longer.
  4. Add 4 cups Rice Krispies to marshmallow mixture and stir until well coated.
  5. Using a butter spatula, press mixture around the outer rim of cake pan to desired to width (about two inches.)
For the Watermelon Layer:
  1. Place four cups of Kellogg’s Rice Krispies in a large bowl.
  2. Melt ¼ cup of butter in a large sauce pan over low heat. Add red (or rose) Food coloring (a few drops at a time until desired color). Add regular marshmallows and stir until melted and well blended. Cook two minutes longer.
  3. Add 4 cups Rice Krispies to marshmallow mixture and stir until well coated.
  4. Using a butter spatula, press mixture into the remaining area of cake pan.
  5. Add chocolate chips or raisins for garnish. 
Here are steps with photos and instructions on how to make the watermelon Rice Krispie (Sorry the photos aren't great but I was making this at night where the lighting is not great for photos)..
 
Add Rice Krispies to marshmallow mixture:
 
Add 4 cups Rice Krispies to marshmallow mixture and stir until well coated
 
Using a butter spatula, 
press mixture around the outer rim of cake pan to desired to width (about two inches):
Using a butter spatula, 
press red/rose Rice Krispie mixture into the remaining area of cake pan:

Add chocolate chips or raisins for garnish:

Cut in slices and Enjoy!!

Enchilada Stuffed Mushrooms

 
Mushrooms are a staple in my house. I can eat them fresh in a salad, sauted in butter as a side dish, thrown in pasta....but best of all, stuff them with yummy-ness and I'm all over them.

I found this Enchilada Stuffed Mushroom recipe from Lauren's Latest a few months ago and have made them at least 4x. So this a definite recipe worth mentioning. I have altered her wonderful recipe a bit due to me liking to use the entire mushroom and I don't always have green onions on hand. But by all means please check out her recipe because she gets full credit for making and sharing the recipe for these incredible mushrooms!

Ingredients:
20-24 fresh whole mushrooms (button, bella - whatever you like)

1 tbsp vegetable oil OR butter
1 sweet onion, minced fine  
6 oz. softened cream cheese
1 cup grated cheddar cheese, divided
1/4 cup grated Parmesan cheese
1 teaspoon taco seasoning
salt & black pepper, to taste
1 cup red enchilada sauce 


Directions:
Preheat oven to 375 degrees. Lightly grease baking dish with non stick cooking spray and set aside.


Clean mushrooms with a damp paper towel. Carefully break off stems. Chop stems extremely fine, discarding tough end of stems.

Heat oil (or butter, I like to use butter) in a large skillet over medium heat. Add onion and chopped mushroom stems to the skillet. Saute until any moisture has disappeared, taking care not to burn onion. Set aside to cool. 

When onion and mushroom mixture is no longer hot, stir in cream cheese, 3/4 cup cheddar, Parmesan cheese, salt & black pepper, and taco seasoning. Mixture should be very thick. Using a small spoon, fill each mushroom cap with a generous amount of stuffing. Arrange the mushroom caps in prepared baking dish. 

Pour enchilada sauce over top. Sprinkle with remaining 1/4 cup cheddar cheese. Bake 20-30 minutes until browned and bubbly. Serve hot (they taste great at room temperature too. Heck, the even taste great cold!)


Makes: 20-24 mushrooms:


Thank you Lauren for sharing this recipe!
Be sure to check our her other recipes. I am a huge fan of hers!
 
Enjoy! 

Wednesday, August 29, 2012

Fresh Tomato Salsa


There's nothing better than fresh tomatoes from the garden. 
I really am enjoying them from my garden and the local farmer's market this year.

Ingredients:
  • 6 ripe Roma plum tomatoes, peeled and seeds removed, chopped
  • 3 tablespoons finely chopped onion
  • 2 small cloves garlic, minced
  • 2 hot chile peppers, Serrano or Jalapeno, finely chopped
  • 2 to 3 tablespoons minced fresh cilantro
  • 1 1/2 to 2 tablespoons lime juice
  • salt and pepper
Directions:
Combine onions and garlic with chopped tomatoes, peppers, cilantro, lime juice, salt, and pepper. Refrigerate for 2 to 4 hours to blend flavors. Makes approximately 2 cups.

This salsa is so good, I doubled the recipe. I just love the fresh crispness of all the fresh ingredients.

Enjoy!