Wednesday, December 14, 2011

Red Velvet Holly Cupcakes

Red Velvet Cupcakes with Chocolate Holly Leaves


Mini Red Velvet Cupcakes

For quite a few months I've been experiencing with a variety of cupcake recipes and decorating techniques for a variety of reasons (I'll post about that after that Holidays). I made these Red Velvet cupcakes for a Holiday gathering I was suppose to have this past Friday but things didn't work as planned so I saved the cupcakes for the next evening to share with friends and family to taste while we took photos of my son getting ready for his first-time high school dance.

These cupcakes were made with boxed Red Velvet cupcakes (I haven't found the perfect red velvet cupcake recipe yet so I went with a boxed cupcake) and made my own cream cheese frosting. To make them a tad more festive, I made chocolate holly leaves with red and green candy melts.

Chocolate Holly Leaves

To make the Chocolate Holly Leaves, I printed out a holly template from FreePrintables and then placed a sheet of waxed paper on top of the printout and piped melted chocolate following the template. I got the idea from when I made Turkey Feathers for some Turkey Cupcakes I made a few weeks back.

I have found it to be great fun to make cupcake toppers with chocolate motifs! Thinking up so new ideas to try soon.

Cream Cheese Frosting:

Ingredients:
  • 8 oz. cream cheese
  • 5 tbsp. unsalted butter, at room temperature
  • 2 tsp. vanilla extract
  • 2½ to 3 cups confectioners’ sugar, sifted
Directions:

To make the frosting, combine the cream cheese and butter in the bowl of an electric mixer. Beat on medium-high speed until well combined and smooth, about 2-3 minutes. Mix in the vanilla extract. Gradually beat in the confectioners’ sugar until totally incorporated, increase the speed and then beat until smooth.

Note: If you like a lot of frosting you may want to increase this by 50% for 24 cupcakes.

Sunday, December 4, 2011

Holiday Cake Bon Bons


Several times during my career as a stay-at-home and as a working-mom references have been made in regards to "sitting around and eating bon bons". Honestly, I never knew what a bon bon was other than maybe it was some type of candy. If you want the full meaning of a bon bon, head over to the the South of France for a wonderful explanation.

This conversation of "sitting around and eating bon bons" came up in conversation recently. Unfortunately it was not a very nice conversation. But (after some stewing over the insult) I though hey I need to make some of these little delicious treats just see what I've been missing out on. I chose to make Cake Bon Bons (which I guess really aren't bon bons by definition), but this is what I choose to try. These Holiday Cake Bon Bons are adapted from Betty Crocker. I made over 100 of them. And yes, I sat down and ate two bon-bons (someone had to taste test) and then donated the remaining bon bons to the church for my son's high school retreat this past Thursday.

Go ahead, eat some Bon bons !!
Bon bons send good happiness to all moms, dads, and kids.
These would make a delicious teacher or hostess gift.

Red Velvet Cake Holiday Bon Bons

Chocolate Fudge Cake Holiday Bon Bons


Holiday Cake Bon Bons Recipe:

Ingredients:
  • 1 cake mix (any flavor)*
  • Water, vegetable oil and eggs called for on cake mix box
  • 1 container frosting
  • 36 oz (from two 24-oz packages) vanilla or chocolate-flavored candy coating (such as Wilton Candy Melts)
Preparation:
  1. Heat oven to 350°F (325°F for dark or nonstick pan). Make and bake cake as directed on box for 13x9-inch pan. Cool 15 minutes.
  2. In large bowl, crumble warm cake; stir in frosting until well blended (depending on the moistness of you cake, you may want to use only 3/4 of a can so that it's not too sticky or greasy). Refrigerate 1 to 2 hours or until firm enough to shape.
  3. Freeze 30 minutes. Shape into balls. (If mixture is too sticky, refrigerate or freeze a bit longer until firm enough to shape).
  4. Line another cookie sheet with foil (I use non-stick foil). In 1-quart microwavable bowl, microwave 12 oz candy coating uncovered on High 1 minute 30 seconds; stir. Continue microwaving and stirring in 15-second intervals until melted and smooth. Remove one-third of the balls from the freezer. Using 2 forks, dip and roll each ball in coating. Place on foil-covered cookie sheet. Decorate as desired. Refrigerate cake balls about 10 minutes or until coating is set. Melt remaining candy coating in 12-oz batches; dip remaining balls. Serve at room temperature. Store in airtight container.
*For Red Velvet Cake Bon Bons use 1 box of Red Velvet Cake mix and 1 container of Cream Cheese Frosting

*For Chocolate Fudge Cake Bon Bons use 1 box of Chocolate Fudge Cake mix and 1 container of Chocolate Cheese Frosting. These would be great with a walnut half added to the middle of the bon bon or even some chopped nuts mixed before shaping into balls.

Enjoy!


Sit back and enjoy some bon bons!

Friday, November 18, 2011

Our Favorite Apple Caramel Pie {Contest Recipe}

Come join Love the Pie with TidyMom sponsored by Cherokee USA, Le Creuset, Wilton, Bags by Bloom and Harvard Common Press


All right, I'm in Tidy Mom's 3rd Annual Love The Contest! It's Thanksgiving so I'm chiming into the contest with our favorite Apple Pie. My son and I love all and any apple pie. Apple Pie is our Traditional Thanksgiving pie as well as my son's traditional Birthday Pie (he's not a cake eater so I've been making Apple Pie for his birthday over the past few years).

I've tried bunches and bunches of recipes to get just the right taste and texture. I've adapted and combined different Apple Pie and Pie Crust recipes and this is what I have come up with to be our favorite Apple Pie.

Birthday Apple Pie ... with candles of course!
14th Birthday (wow, he changed alot in one year!)

13th Birthday

Apple Pie in the Makes ...
Here's our favorite apple pie before going in the oven .. see that yummy caramel topping on top - yum .. this is the key for this pie!

Hot Apple Pie right out of the oven! Can you smell it now .. mmmm
Apple Pie
Ingredients:
  • 1 recipe pastry for a 9 inch double crust pie
  • 1/2 cup unsalted butter
  • 3 tablespoons all-purpose flour
  • 1/4 cup water
  • 1/2 cup white sugar
  • 1/2 cup packed brown sugar
  • 1 tablespoon fresh lemon juice
  • 1/4 cup sugar (for apples)
  • 1/2 tsp apple pie spice (or a combination of cinnamon & nutmeg)
  • 8 Large Apples - peeled, cored and sliced. I use a mix of apples such as granny smith, johna gold, and fuji. Or you may use all Granny Smith Apples
Directions:

Preheat oven to 425 degrees F (220 degrees C). Melt the butter in a saucepan. Stir in flour to form a paste. Add water, white sugar and brown sugar, and bring to a boil. Reduce temperature and let simmer until thick and gooey (like caramel). Reserve 3-4 tablepsoons of the caramel mixture.

Place the bottom crust in your pie pan. Fill with apples, mounded slightly. Cover with a lattice work crust. Gently pour the caramel mixture over the apples. Cover witih top crust. Cut 3 slits on the top crust. Drizzle reserved caramel mixture on the top crust.

Bake 15 minutes in the preheated oven. Reduce the temperature to 350 degrees F (175 degrees C). Continue baking for 35 to 45 minutes, until apples are soft.

Pie Crust
Ingredients:
  • 4 cups all-purpose flour
  • 1 cup shortening
  • 1 cup butter
  • 1 tablespoon white sugar
  • 1 teaspoon salt
  • 1/2 cup ice water
  • 1 egg
  • 1 tablespoon distilled white vinegar
Directions:

In a large bowl, mix flour, shortening, sugar and salt.
Add ice water, vinegar and egg. Mix until dough forms a ball.
Allow dough to rest in refrigerator for 10 or 20 minutes before rolling.
This dough makes enough for 1 double crust pie and 1 single pie crust. So it's great for Thanksgiving so you can make an apple pie and a pumpkin pie!

Note: This dough freezes well.

Thanksgiving Apple Pie!!

If you have a favorite pie, link up for the pie contest over at Tidy Mom's and maybe you'll win (but I hope I do).

Happy Thanksgiving!!

Tuesday, November 15, 2011

Turkey Cupcakes {Tutorial}

It's that time of year again .. gobble gobble 'til you wobble!!

Here is a quick and fun way to decorate your cupcakes for your Thanksgiving dessert table or to bring to your child's school party (Oh, I miss those parties, my kids are now 12 and 14 so no more school parties, but they still love special treats at home).

About two weeks ago I taught a cupcake decorating class and as part of the I wanted to demonstrate how to use other foods, candies, etc. to assist in your cupcake decorating. I adapted these Turkey Cupcakes from Betty Crocker.

The cupcakes were made with boxed yellow cake, Betty Crocker Rich & Creamy Chocolate Frosting, Hershey Kisses Candy, and the turkey feathers were made from Hershey's Milk Chocolate Chips, Reese's Peanut Butter Chips and Wilton Candy Melts. See below how to make the turkey feathers and how to assemble the turkey cupcakes.

For the Cupcakes, you will need:
Ingredients:
  • 1 box of Yellow Cake Mix
  • 1 can of Chocolate Frosting
  • Hershey Kisses
  • Chocolate Candy Turkey Feathers (see how to below)
Directions:
Bake cupcakes according to the package directions. For tasty cupcakes, don't over bake! Follow the directions below on to assemble the Turkey Cupcakes.

For the Chocolate Candy Turkey Feathers, you will need:
Ingredients:
  • Wax paper
  • Ziploc sandwich bag (or pastry bag)
  • Hershey's Milk Chocolate Chips
  • Reese's Peanut Butter Chips
  • White paper (such as printer paper)
  • Wilton White Chocolate Melts*
  • Orange food coloring*
Note: You may use Orange colored White Chocolate Melts but I was looking for a lighter orange color so I used food coloring to make them orange color I preferred. (add food coloring to the white chocolate melts immediately after melting, stir until color is incorporated).

Hand draw a feather template where the feather is 3 inches high by 2.5 wide. Next, hand draw a small feather template that is 2.5inches high by 2 inches wide. Here's a sample (where I have the large and small feathers drawn near each other)


Place approximately 1/2 cup of peanut butter chips in a microwave safe bowl. Micorwave until just melted (30-40 seconds. time will vary depending on your microwave.)

Spoon the melted peanut butter chips into a Ziploc sandwich size bag. Close the bag (remove as much air as you can before closing).
Cut a very small opening at the tip of the bag ...
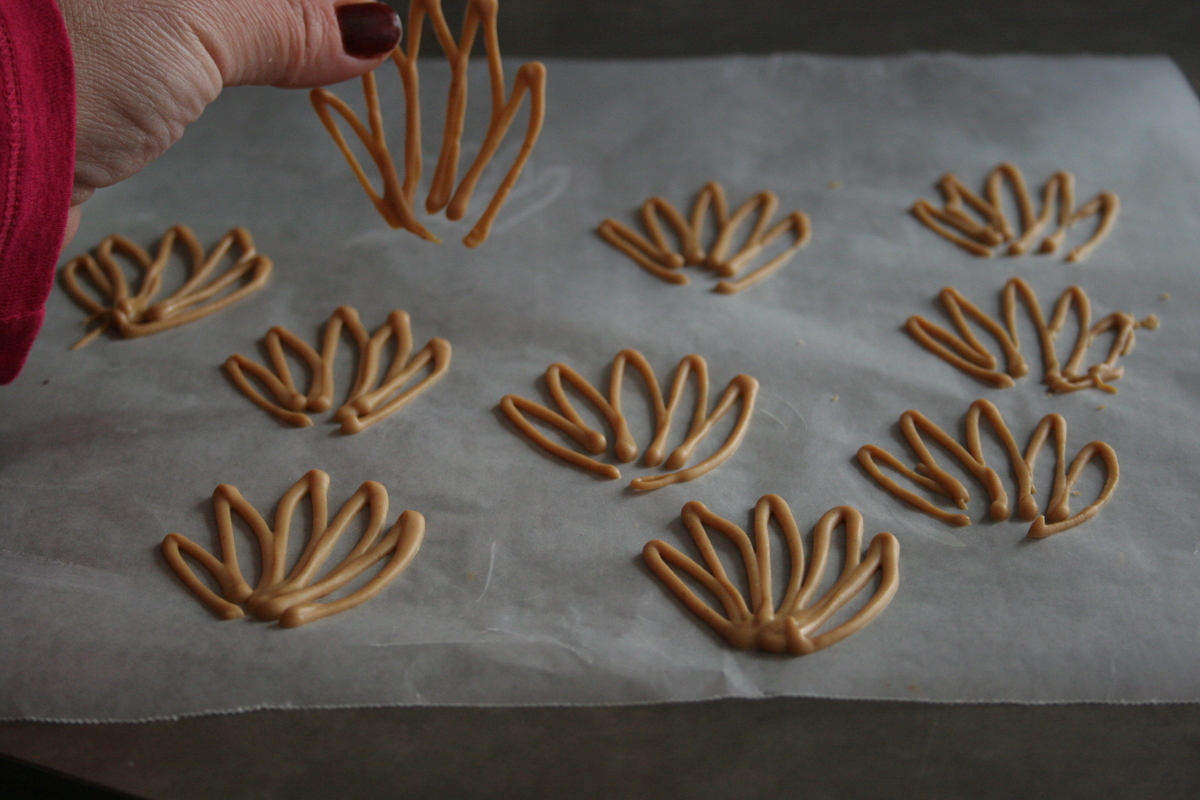
Place a sheet of wax paper over your feather template. And now begin to pipe the feathers following your template (use the SMALLER template for the PB feathers). After you've completed the first feather, slide your wax paper over template just enough so that you can pipe another feather. Continue to make 24 feathers (for 24 cupcakes). You will do the same for the Orange White Chocolate Feathers by piping over the smaller feather template. And the repeat the steps for the Milk Chocolate Feathers by using the LARGER feather template.

The photos below show you how to pipe using the smaller feather template:


Leave feathers on wax paper to harden (maybe 30 minutes). You can carefully place them in the fridge if you want them to harden faster. Once they have hardened, carefully remove them from the wax paper.Repeat the above for the Orange White Chocolate Feathers and for the Milk Chocolate Feathers (Use the LARGER template for the Milk Chocolate Feathers).
Note: We loved just eating the PB feathers so you may want to make a few extras for munching.
And Just for fun my daughter made a little chocolate turkey :)

To assemble Turkey Cupcakes:

Frost the cupcake with a generous amount of chocolate frosting:
Insert Milk Chocolate Feather into the frosted cupcake as such:
Insert Orange White Chocolate Feather:
(Do the same for the Peanut Butter Feather - Sorry I don't have a photo for that )

Place Hershey Kiss in front of the feathers:

Ta, Da!! ... Turkey Cupcakes!!
Gobble, Gobble and Happy Thanksgiving!