
Halloween is my favorite holiday! I love to decorate this time of year
with all the great fall colors, orange, yellow, black, red, brown...and
pink! Yes pink!!! This year we took the plunge and went for a pink and
black halloween party theme. Thanks to
Anders Ruff,
my daughter and I were completely inspired to have a Pink-O-Ween party
to celebrate Halloween along with celebrating her 11th birthday. I
purchased a personalized
Pink-0-Ween party invitation and printable Pink-O-Ween Halloween design collection from
Anders Ruff Custom Designs on Etsy.
During the month of October they will donate $2 The Susan G. Komen
Foundation in honor of October's Breast Cancer Awareness month. I can't
say enough nice things about the invitation and printable design
collection ... and so friendly to work with.
Come have a look at our Pink-O-Ween Halloween 11th Birthday Party that we created with Anders Ruff great printable design collection, some internet searching, some imagination, cooking, sewing and a bit of creativity...

Personalized party invitation made by
Anders Ruff. I printed the invitation on white card stock and assembled the party invitations by attaching the printed invitation onto pink & black card stock. I found some really cool black card stock that felt like leather...the girls loved their invitations!


The party food was in our dining room. I decorated my dining room hutch with the printable Pink-O-Ween Halloween design collection. And I made a paper spider web using
Jennifer's hanging spider tutorial over at
Muse Lodge ... so easy, so cute!


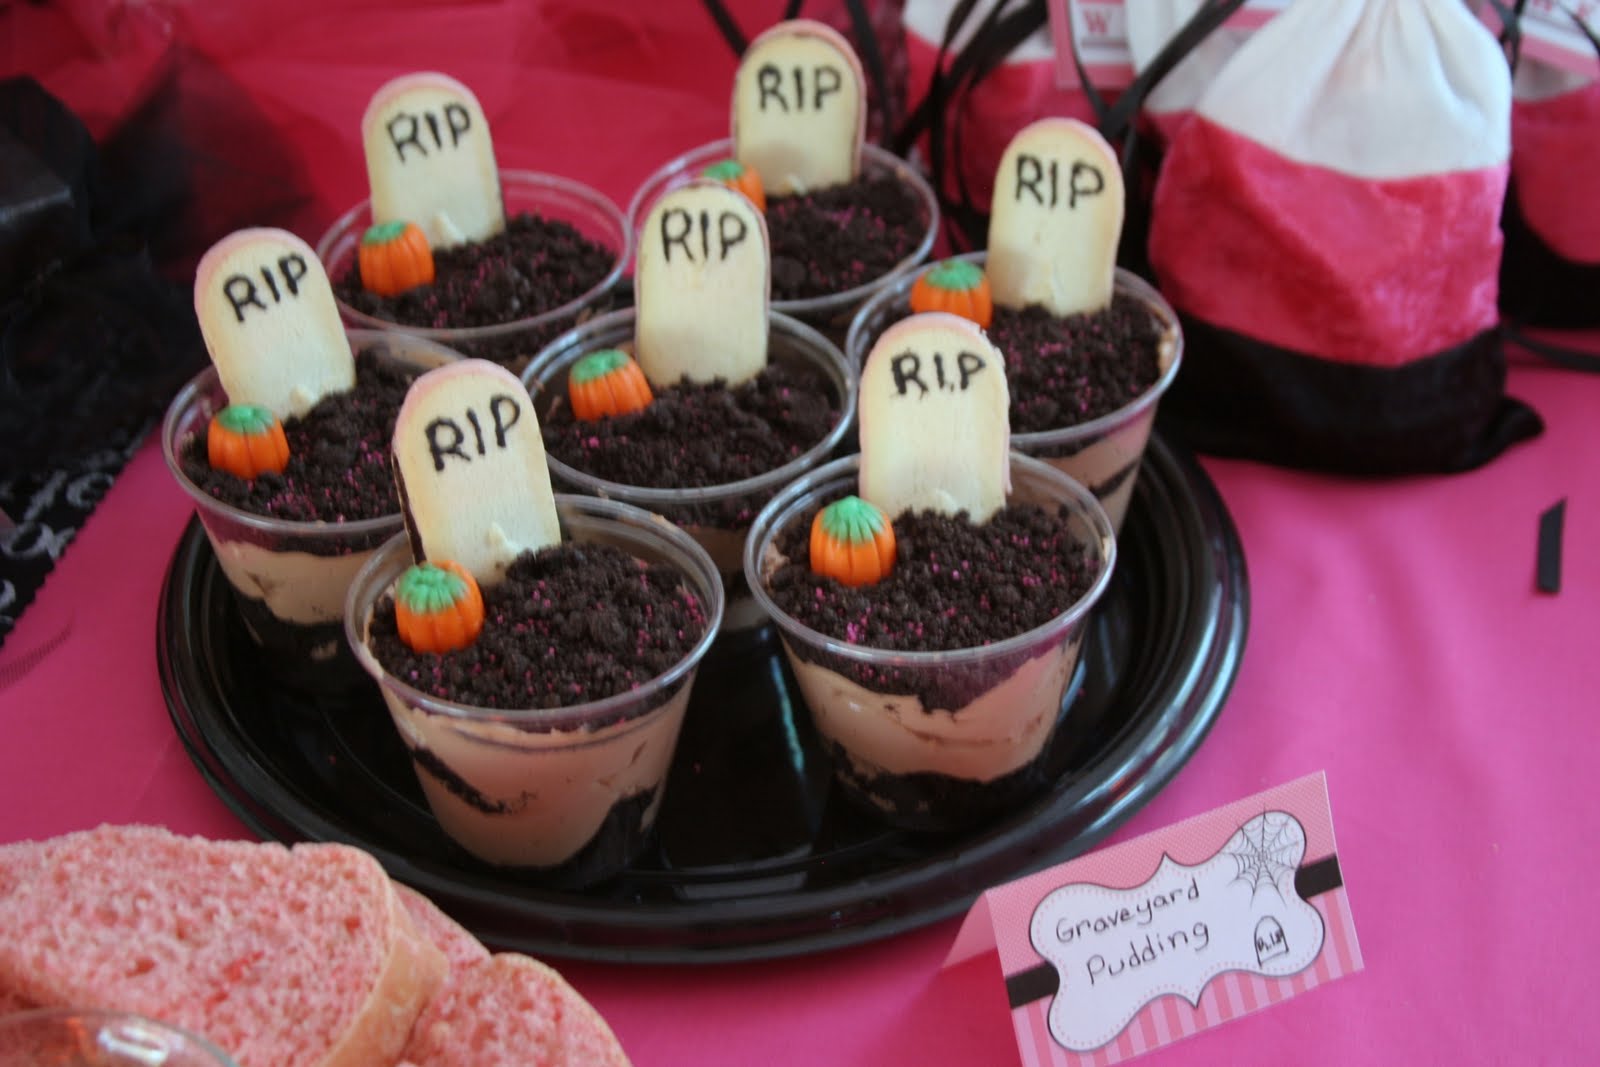
RIP Graveyard Dirt Cake Cups
..always a good treat
Ingredients:
• 1 (20 oz) package chocolate sandwich cookies with creme filling
• 1/4 cup butter, softened
• 1 (8 oz) package cream cheese, softened
• 1 cup confectioners' sugar
• 1 teaspoon vanilla extract
• 2 (3.9 oz) packs instant chocolate pudding mix
• 3 cups milk
• 1 (12 oz) container frozen whipped topping, thawed
• 1 package of Pepperidge Farm Milano cookies
• 1 bottle of Black Cookie Icing
• 16 Candy Pumpkins
• Pink colored sugar sprinkles
• 16 (9 oz) clear Plastic Cups
Directions:
1. Put the chocolate sandwich cookies in a food processor and process until they become fine crumbs. Set aside.
2. In a large bowl, combine the butter or margarine, cream cheese,
confectioners sugar and vanilla flavoring. Beat on low speed to mix then
beat on medium speed until smooth. Add the chocolate pudding mix and
milk to the bowl. Beat on low speed to combine.
3.Fold the whipped topping into the pudding mixture with a rubber spatula.
4. In each clear plastic cup, assemble in layers as follows: first
layer, 1/3 cookie crumbs; second layer, 1/2 pudding mixture; third
layer, 1/3 cookie crumbs; fifth layer, 1/3 cookie crumbs.
5. Decorate each Pepperidge Farm Milano cookie with black frosting by
piping the letters RIP (or whatever you choose) at the top of each
cookie.
6. Insert decorated Milano cookie into each plastic cup and place a candy pumpkin next to and in front of inserted cookie.
7. Garnish top of each graveyard with pink sprinkles (optional).
For a little splash of pink I used
Pepperidge Farm's Strawberry Chocolate Milano cookies and garnished with neon pink sugar sprinkles


Pink lemonade with spiders and lemonade spider ice cubes.
A creepy punch bowl filled with pink lemonade, spiders & lemonade spider ice cubes all labled with a
Tickled Pink Punch tag had the girls thinking something real special.
Small bottles of water labeled
"Pink-0-Ween Potion" got some giggles
and good conversation going among the 11 year old girls...
Who would have guessed?!
 Creepy Cookies
I made little mice cookies (actually they were more like a truffle) and scattered them around the cookie serving platters amongst little pink-o-ween boxes that were filled with strawberry and chocolate wafer cookies. I have to say the little mice were quite tasty!
 Grape Jello molded into a Brain
...ewwwwww!
 Finger Sandwiches
PB&J on homemade Pink Bread..yep...pink bread
Easy to do by just adding a few drops of neon pink food coloring (or even some beet juice) to your favorite homemade white bread recipe. If you don't want to make your own bread, purchase bread dough and kneed some food coloring into your dough before rising and baking.
 Sweet Treats
Pink and white marshmallows decorated with black frosting.
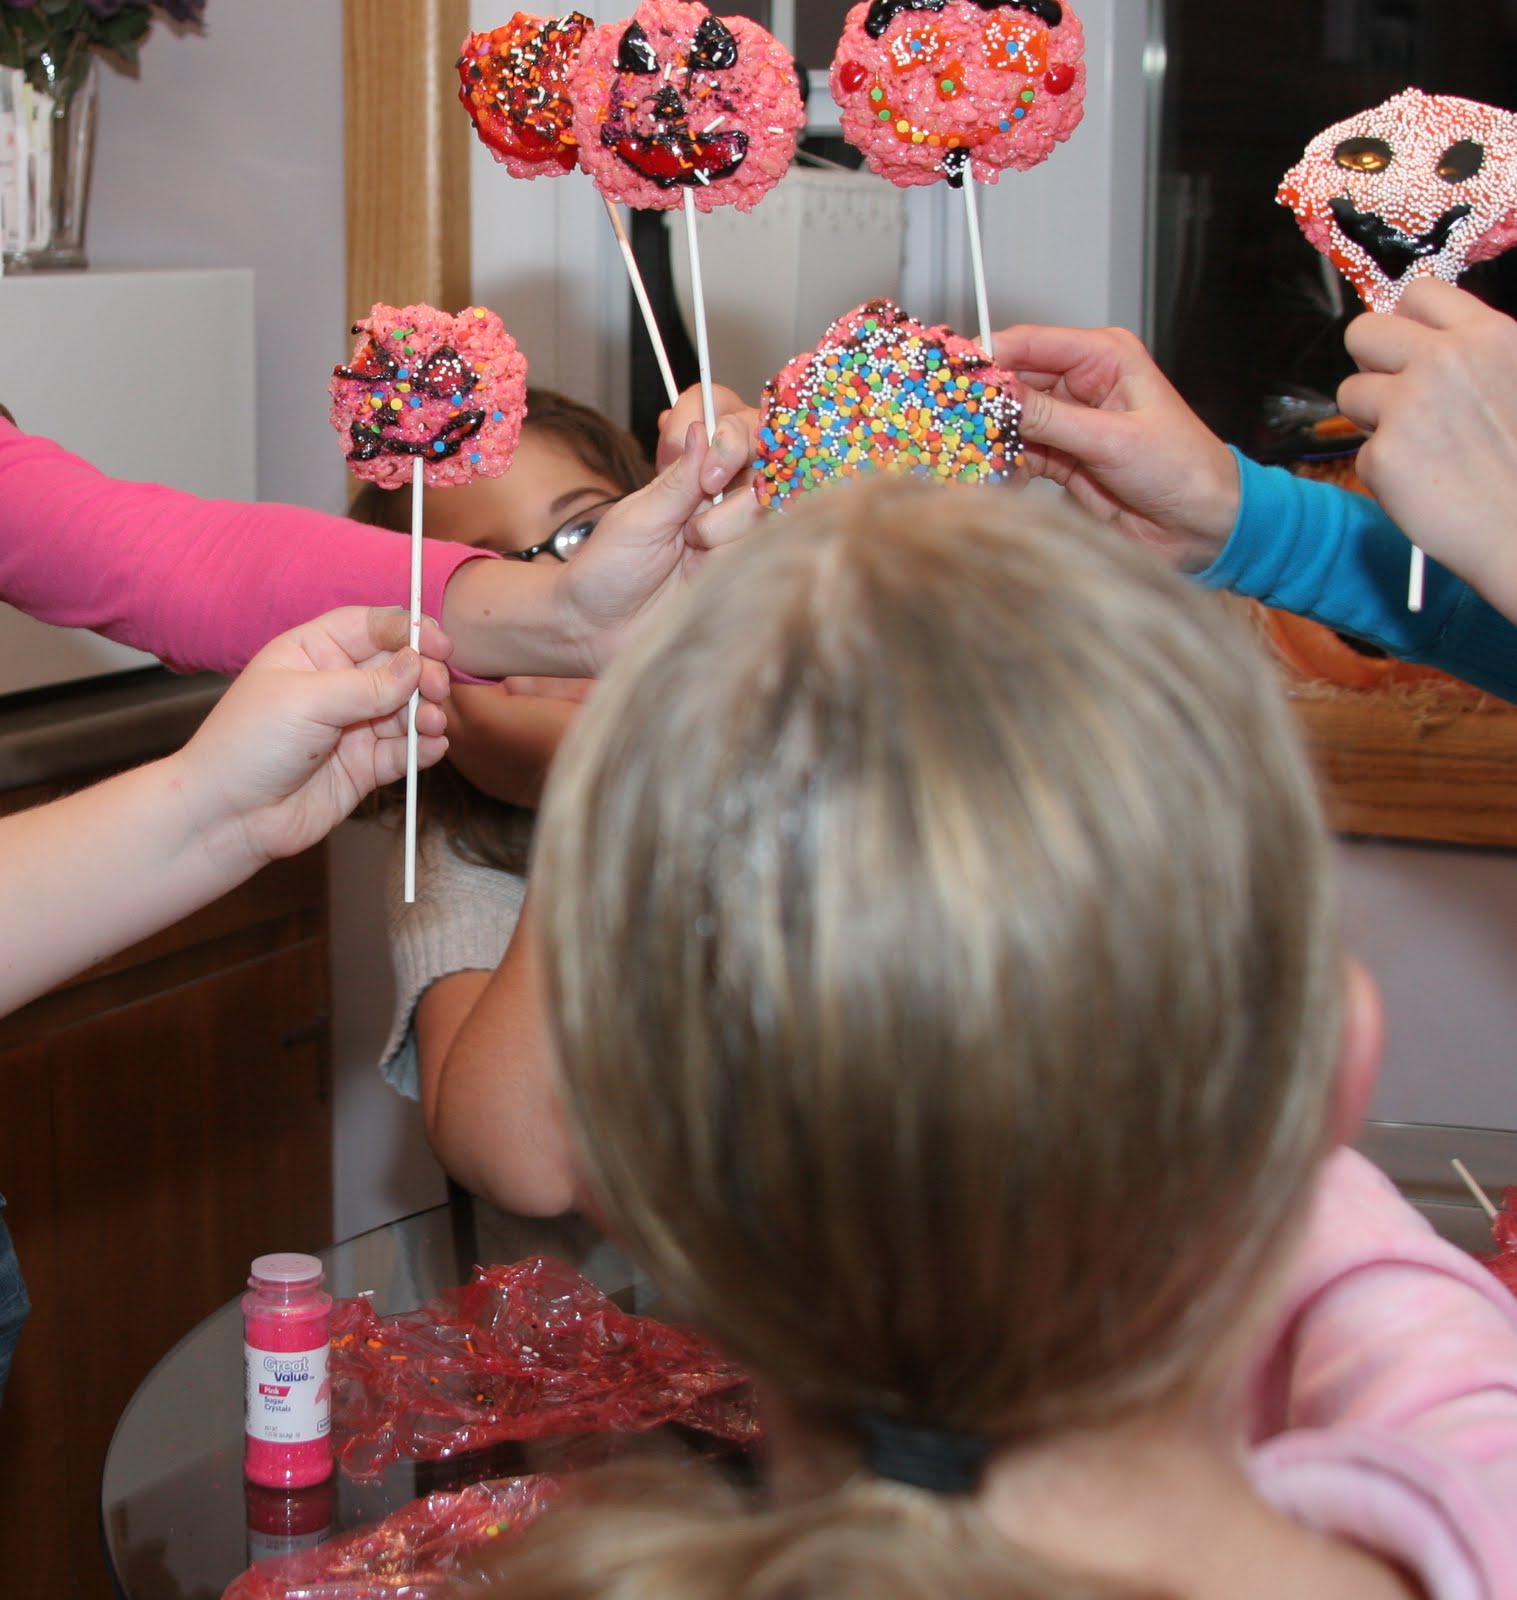
Pink rice krispie treat pops (added neon pink food coloring while making the rice krispie treats)

Boo Pops
Tooties pop lolipops wrapped in pink and black fabric and tied with some ribbon...the girls gobbled these up in no time. For the props I wrapped foam blocks in foil and the covered them in pink and black tulle. Great little props for treats, pops and lollies.


My mom found this adorable
"Queen of Halloween" wooden hat decoration which made a great table decoration. I think we'll be using this for many years.


My all time passion is sewing and creating with fabric so I had to sew something but wanted something quick and cute. So for each of our guests, I made these white, pink and black
Candy Corn Shaped Goodie Bags using crushed velvet and added some ribbon for the pull ties. I filled each bag with pink nail polish, pink nerds, pink & black bubble tape gum, and playdough. My daughter made thank you name tags for each goodie bag from the printable Pink-O-Ween design collection.

I couldn't resist... Punkie Pie's loves aprons
so I made a pink & black apron ... great for any Pink-O-Ween hostess!
Aprons can be purchased on Etsy at
Punkie Pie's Boutique
Pink Pumpkin Rice Krispie Treat Decorating
This was a 4 hour party so it was a must to keep these girls busy..one activity we did was I made pink pumpkin shaped rice krispie treats and had the girls decorate them with frosting and sprinkles.

After eating all this sugar it was time to run it off by playing a
Cotton Ball Relay...
2 teams, 2 bags of cotton balls, 2 bowls...the object of the game is to get all the cotton balls from your pile (or bag), that are at one end of the room, into a bowl at the opposite end of the room...no hands allowed!

So much fun watching them scoop, push, scoot and even hop.
I think the girls all had a good time.
I know my daughter loved it and really enjoyed herself - it's what it's all about...
...lots of smiles and giggles!!
Happy Pink-O-Ween
I'm so glad I found
Anders Ruff and their
Pink-O-Ween Halloween Design Collection. Head over to their
shop and see all the wonderful collections they offer.
I can't wait to for Christmas......


